Up and running
The aim of this guide is to explain how EctoNeo4j works with a full example.
Neo4j is required, so if you haven't installed it yet, get it at https://neo4j.com/download/.
Be sure to have a running database with the following credentials:
- login:
neo4j - password:
graph_app_pass
Unsupported features
Not all Ecto features are supported, either because they aren't implemented yet in EctoNeo4j or because they-re irrelevant in a graph context.
Unsupported features:
- subqueries: complicated to translate them in
WITHterms - streams: will be supported
- migration: only some parts are supported, other are irrelevant as Neo4j is schemaless
The Project: GraphApp
We are going to build a backend to manage the data for a blog application.
The model will be as follow: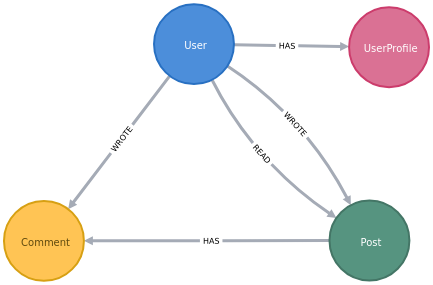
a User can only have one UserProfile.
a User can write multiple Posts.
a User can read multiple Posts.
a User can write multiple Comments.
a Post can have multiple Comments.
User properties:
- firstName
- lastName
UserProfile properties:
- avatarUrl
- age
Post properties:
- title
- text
Comment properties:
- text
:WROTE (from User to Post, and from User to Comment) properties:
- when
Create the application
We create our supervised application via
mix new --sup graph_app
* creating README.md
* creating .formatter.exs
...
* creating test/graph_app_test.exs

Your Mix project was created successfully.
You can use "mix" to compile it, test it, and more:

    cd graph_app
    mix test

Run "mix help" for more commands.
Now, we can add our dependencies in mix.exs:
# mix.exs
defp deps do
    [
      {:ecto, "~> 3.2"},
      {:ecto_sql, "~> 3.2"},
      {:ecto_neo4j, "~> 0.6"}
    ]
  end
and
mix do deps get, compileConfiguration
It's time to define our Repo and to add its config.
Open config/config.exs and add:
# config/config.exs
config :graph_app, ecto_repos: [GraphApp.Repo]
We add the repo config (as we would do with any ecto adapters):
# config/config.exs
config :graph_app, GraphApp.Repo,
  hostname: 'localhost',
  basic_auth: [username: "neo4j", password: "graph_app_pass"],
  port: 7687
We create our repo module:
# lib/graph_app/repo.ex
defmodule GraphApp.Repo do
  use Ecto.Repo, otp_app: :graph_app, adapter: Ecto.Adapters.Neo4j
end
And we don't forget to add to our application supervisor:
# lib/graph_app/application
def start(_type, _args) do
  # List all child processes to be supervised
  children = [
    GraphApp.Repo
  ]
  opts = [strategy: :one_for_one, name: GraphApp.Supervisor]
  Supervisor.start_link(children, opts)
end
Now, we can make our first query in iex to test that everything has been well configured:
iex -S mix
iex> Ecto.Adapters.Neo4j.query!("RETURN 1 AS num")
%Bolt.Sips.Response{
  bookmark: "neo4j:bookmark:v1:tx1",
  fields: ["num"],
  notifications: [],
  plan: nil,
  profile: nil,
  records: [[1]],
  results: [%{"num" => 1}],
  stats: [],
  type: "r"
}
Formating
EctoNeo4j has functions with custom formating.
Be sure to get these benefits by addin this to your .formatter.exs:
# .formatter.exs
...
import_deps: [:ecto_neo4j]
...