

![]()
Circuits.GPIO lets you use GPIOs in Elixir.
Getting started on Nerves and Linux
If you're natively compiling circuits_gpio using Nerves or using a Linux-based
SBC like a Raspberry Pi, everything should work like any other Elixir library.
Normally, you would include circuits_gpio as a dependency in your mix.exs
like this:
def deps do
  [{:circuits_gpio, "~> 2.1"}]
end
One common error on RaspberryPi OS is that the Erlang headers are missing
(erl_nif.h), you may need to install erlang with apt-get install erlang-dev
or build Erlang from source per instructions here.
Examples
While Circuits.GPIO can support non-Nerves and non-Linux systems, the examples
below were made using Nerves. Operation on other devices mostly differs on how
to refer to GPIOs.
The following examples were tested on a Raspberry Pi that was connected to an Erlang Embedded Demo Board. There's nothing special about either the demo board or the Raspberry Pi.
Nerves + Livebook
Nerves Livebook project allows you to try out the Nerves project on real hardware without needing to build a project from scratch.
Within minutes, you'll have a Raspberry Pi or Beaglebone running Nerves. You'll be able to run code in Livebook and work through Nerves tutorials from the comfort of your browser.
![]()
GPIO
A General Purpose Input/Output (GPIO) is just a wire that you can use as an input or an output. It can only be one of two values, 0 or 1. A 1 corresponds to a logic high voltage like 3.3 V and a 0 corresponds to 0 V. The actual voltage depends on the hardware.
Here's an example of turning an LED on or off:
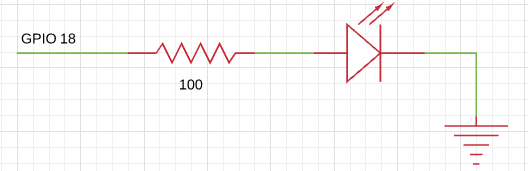
To turn on the LED that's connected to the net (or wire) labeled GPIO18, you
need to open it first. The first parameter to Circuits.GPIO.open/2 is called a
GPIO spec and identifies the GPIO. The Raspberry Pis are nice and provide string
names for GPIOs. Other boards are not as nice so you always have to check. The
string name for this GPIO is "GPIO18" (use "PIN12" on a Raspberry Pi 5).
iex> {:ok, gpio} = Circuits.GPIO.open("GPIO12", :output)
{:ok, %Circuits.GPIO.CDev{...}}

iex> Circuits.GPIO.write(gpio, 1)
:ok

iex> Circuits.GPIO.close(gpio)
:ok
The call to Circuits.GPIO.close/1 is not necessary, since the garbage
collector will free up unreferenced GPIOs. It's a good practice, though,
since backends can enforce exclusivity and prevent future opens from
working until the GC occurs.
Input works similarly. Here's an example of a button with a pull down resistor connected.
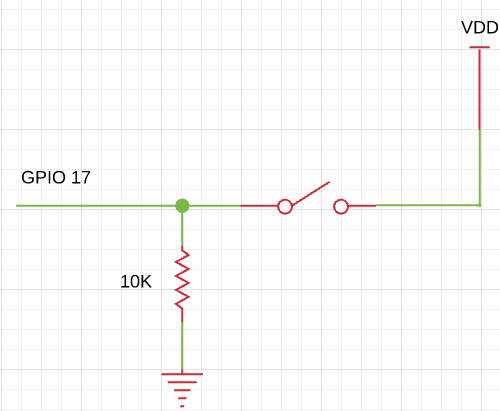
If you're not familiar with pull up or pull down resistors, they're resistors whose purpose is to drive a wire high or low when the button isn't pressed. In this case, it drives the wire low. Many processors have ways of configuring internal resistors to accomplish the same effect without needing to add an external resistor. If you're using a Raspberry Pi, you can use the built-in pull-up/pull-down resistors.
The code looks like this in Circuits.GPIO:
iex> {:ok, gpio} = Circuits.GPIO.open("GPIO17", :input)
{:ok, %Circuits.GPIO.CDev{...}}

iex> Circuits.GPIO.read(gpio)
0

# Push the button down

iex> Circuits.GPIO.read(gpio)
1
If you'd like to get a message when the button is pressed or released, call the
set_interrupts function. You can trigger on the :rising edge, :falling
edge or :both.
iex> Circuits.GPIO.set_interrupts(gpio, :both)
:ok

iex> flush
{:circuits_gpio, "GPIO17", 1233456, 1}
{:circuits_gpio, "GPIO17", 1234567, 0}
:ok
Note that after calling set_interrupts, the calling process will receive an
initial message with the state of the pin. This prevents the race condition
between getting the initial state of the pin and turning on interrupts. Without
it, you could get the state of the pin, it could change states, and then you
could start waiting on it for interrupts. If that happened, you would be out of
sync.
Internal pull-up/pull-down
To connect or disconnect an internal pull-up or pull-down resistor to a GPIO
pin, call the set_pull_mode function.
iex> Circuits.GPIO.set_pull_mode(gpio, pull_mode)
:ok
Valid pull_mode values are :none :pullup, or :pulldown
Note that set_pull_mode is platform dependent, and currently only works for
Raspberry Pi hardware. Calls to set_pull_mode on other platforms will have no
effect. The internal pull-up resistor value is between 50K and 65K, and the
pull-down is between 50K and 60K. It is not possible to read back the current
Pull-up/down settings, and GPIO pull-up pull-down resistor connections are
maintained, even when the CPU is powered down.
GPIO Specs
Circuits.GPIO v2.0 supports a new form of specifying how to open a GPIO called
a t:gpio_spec/0. These specs are very flexible and allow for GPIOs to be
opened by number, a string label, or a tuple that includes both the GPIO
controller hardware name and a line offset.
The contents of a gpio_spec depend on the backend. When running on Nerves or
a Linux machine, Circuits.GPIO uses the Linux gpio-cdev backend. This backend
prefers the use of GPIO controller/line offset tuples and labels. For backwards
compatibility, it somewhat supports use of the older pin numbering scheme.
The GPIO controller part of the tuple is usually some variation on "gpiochip0"
that depends on what controllers are available under /dev. The line offset is
a the line offset of the GPIO on that controller.
iex> {:ok, gpio} = Circuits.GPIO.open({"gpiochip0", 1}, :input)
{:ok, %Circuits.GPIO.CDev{...}}
When the Linux device tree is configured with GPIO labels, you can use those instead:
iex> {:ok, gpio} = Circuits.GPIO.open("special-name-for-pin-1")
{:ok, %Circuits.GPIO.CDev{...}}
If you're deploying to multiple types of devices and you can set labels in the
device tree, labels make it really easy for code using Circuits.GPIO to just
use the right GPIO.
Labels are not guaranteed to be unique, so if your device defines one twice,
Circuits.GPIO will use the first GPIO it finds that has the specified label.
See Enumeration for listing out all available gpio_specs for
your device.
Enumeration
Circuits.GPIO v2.0 supports a new function, enumerate/0, which lists every
known GPIO pin.
For Nerves and Linux users, the gpio-cdev subsystem maintains the official
list. See the Official DeviceTree documentation for
GPIOs
for more information on how to configure the fields of this struct for your own
system.
Here's an example:
iex> Circuits.GPIO.enumerate()
[
  %{
    location: {"gpiochip0", 0},
    label: "ID_SDA",
    controller: "pinctrl-bcm2835"
  },
  %{
    location: {"gpiochip0", 1},
    label: "ID_SCL",
    controller: "pinctrl-bcm2835"
  },
  %{
    location: {"gpiochip0", 2},
    label: "SDA1",
    controller: "pinctrl-bcm2835"
  },
  ...
]
The :location can always be passed as the first parameter to
Circuits.GPIO.open/3. You may find the :label field more descriptive to use,
though.
Convenience functions
Having to open then read and write can be a cumbersome for one-off GPIO
access in code and when working at the IEx prompt. Circuits v2.0 has a pair of
new functions to help:
iex> alias Circuits.GPIO
iex> GPIO.write_one("special-name-for-pin-1", 1)
:ok
iex> GPIO.read_one("special-name-for-pin-2")
1
These functions get passed a t:gpio_spec/0 just like open/3 and internally
open the GPIO and read or write it. Importantly, they close the GPIO when done
to avoid reserving the GPIO any longer than necessary.
Please note that this is not a performant way of reading or writing the same GPIO more than once. Opening a GPIO takes much longer than reading or writing an already opened one, so if these are used in tight loops, the open overhead will dominate (>99% of the time taken in a trivial benchmark.)
Testing
The Circuits.GPIO.CDev backend supports a test mode on platforms without CDev
GPIO support and when MIX_ENV=test. In previous versions of Circuits.GPIO,
this was called the "stub".
There are a couple ways of using it, but you might have it by default especially
if you're on MacOS. To see, run the following and look for test: true:
iex> Circuits.GPIO.backend_info()
%{name: {Circuits.GPIO.CDev, test: true}, pins_open: 0}
If you're not running with test: true, you can force it by setting the default
backend:
config :circuits_gpio, default_backend: {Circuits.GPIO.CDev, test: true}Test mode has 64 GPIOs. Each pair of GPIOs is connected. For example, GPIO 0 is connected to GPIO 1. If you open GPIO 0 as an output and GPIO 1 as an input, you can write to GPIO 0 and see the result on GPIO 1. Here's an example:
iex> {:ok, gpio0} = Circuits.GPIO.open({"gpiochip0", 0}, :output)
{:ok, %Circuits.GPIO.CDev{...}}
iex> {:ok, gpio1} = Circuits.GPIO.open({"gpiochip0", 1}, :input)
{:ok, %Circuits.GPIO.CDev{...}}
iex> Circuits.GPIO.read(gpio1)
0
iex> Circuits.GPIO.write(gpio0, 1)
:ok
iex> Circuits.GPIO.read(gpio1)
1
Test mode is fairly limited, but it does support interrupts.
Migration from v1.x
v2.x is the current version of Circuits.GPIO.
Circuits.GPIO v2.0 is an almost backwards compatible update to Circuits.GPIO
v1.x. Here's what's new:
- Linux or Nerves are no longer required. In fact, the NIF supporting them won't be compiled if you don't want it.
- GPIOs can be enumerated to see what's available (See
Circuits.GPIO.enumerate/0) - Linux and Nerves now use the Linux GPIO cdev subsystem rather than sysfs
- GPIO pull mode setting for all platforms that support it rather than only Raspberry Pi
- Develop using simulated GPIOs to work with LEDs and buttons with CircuitsSim
If you've used Circuits.GPIO v1.x, nearly all of your code will be the
same.Circuits.GPIO offers a substantial improvement by more descriptive GPIO
specs for identifying GPIOs. You can still refer to GPIOs by number. However,
you can also refer to GPIOs by labels and by which GPIO controller handles them.
The new enumerate/0 can help with this.
If you are using a previous version and wish to update, review the porting guide. Also see circuits_gpio v1.x maintenance branch.
FAQ
Where can I get help?
Most issues people have are on how to communicate with hardware for the first
time. Since Circuits.GPIO is a thin wrapper on the Linux CDev GPIO interface,
you may find help by searching for similar issues when using Python or C.
For help specifically with Circuits.GPIO, you may also find help on the nerves
channel on the elixir-lang Slack. Many
Nerves users also use Circuits.GPIO.
I tried turning on and off a GPIO as fast as I could. Why was it slow?
Please don't do that - there are so many better ways of accomplishing whatever you're trying to do:
- If you're trying to drive a servo or dim an LED, look into PWM. Many platforms have PWM hardware and you won't tax your CPU at all. If your platform is missing a PWM, several chips are available that take I2C commands to drive a PWM output.
- If you need to implement a wire level protocol to talk to a device, look for a Linux kernel driver. It may just be a matter of loading the right kernel module.
- If you want a blinking LED to indicate status,
gpioreally should be fast enough to do that, but check out Linux's LED class interface. Linux can flash LEDs, trigger off events and more. See nerves_leds.
If you're still intent on optimizing GPIO access, you may be interested in gpio_twiddler. Note that the twiddler doc is dated. Circuits.GPIO v2 should be faster than v1.
Can I develop code that uses GPIO on my laptop?
The intended way to support this is to have a custom Circuits.GPIO.Backend
that runs on your laptop. The
CircuitsSim is an example of
a project that provides simulated LEDs and buttons.
License
All original source code in this project is licensed under Apache-2.0.
Additionally, this project follows the REUSE recommendations and labels so that licensing and copyright are clear at the file level.
Exceptions to Apache-2.0 licensing are:
- Configuration and data files are licensed under CC0-1.0
- Documentation files are CC-BY-4.0
- Erlang Embedded board images are Solderpad Hardware License v0.51.