View Source README
You Only Look Once (YOLO) is a cutting-edge, real-time object detection system. It works by predicting bounding boxes and class probabilities directly from an input image in a single evaluation, making it exceptionally fast compared to other object detection methods. YOLO models are widely used in applications like autonomous driving, surveillance, and robotics due to their balance of speed and accuracy.
YOLO is an Elixir library designed to simplify object detection by providing seamless integration of YOLO models. With this library, you can efficiently utilize the power of YOLO for real-time object detection.
The library is built with the following objectives:
Speed
Achieve real-time object detection performance, even on resource-constrained devices like a MacBook Air M3. Details about performance can be found in the benchmarks section.Ease of Use
Designed to be straightforward and user-friendly, the library enables developers to load and detect objects with just two function calls.Extensibility
Currently supporting YOLOv8 (in various model sizes such asn,s, ...,x), the library is built around aYOLO.Modelbehavior. It leverages ONNX and Ortex, making it adaptable for supporting other YOLO versions or custom models in the future.
IMPORTANT: ONNX model files!
To run a YOLOv8 model, we typically need the neural network structure and the pre-trained weights obtained from training the model. While we could build the network using libraries like Axon (or Keras in Python), I've preferred to simplify the process by using a pre-existing PyTorch model from Ultralytics. Ultralytics developed and trained YOLOv8 models, which are available under a GPL license. However, to avoid potential licensing conflicts with this library, I haven't included the ONNX model exports directly here. Instead, you need to convert the PyTorch .pt file into an ONNX format. No worries, I got you covered!
Ultralytics' YOLOv8 comes in several sizes: n (nano), s (small), m (medium), l (large), and x (extra-large). Larger models offer better performance in terms of classification accuracy and object detection but require more computational resources and memory.
You can use the python/yolov8_to_onnx.py script found in the GitHub repo.
First, install the dependencies (requests and ultralytics)
pip install -r python/requirements.txt
Then, run the script by specifying the model size, such as n:
python python/yolov8_to_onnx.py n
The script will download the .pt model and generate two files:
models/yolov8n.onnx: the YOLOv8n model with weightsmodels/yolov8n_classes.json: the list of object classes
Getting Started
First install the library and configure Nx.
mix.exs
defp deps do
  {:yolo, ">= 0.0.0"},

  # I'm using EXLA as Nx backend on my MacBook Air M3
  # Nx is mostly used for pre/post processing
  {:exla, "~> 0.9.2"},
  # evision for image processing (you can use :image instead)
  {:evision, "~> 0.2.0"}
end
config.exs
Enable hardware acceleration in Ortex based on platform (CoreML on Mac, DirectML on Windows, CUDA/TensorRT on Linux)
# Mac with CoreML
config :ortex, Ortex.Native, features: [:coreml]

# Windows machine, DirectML
config :ortex, Ortex.Native, features: [:directml]

#CUDA/TensorRT
config :ortex, Ortex.Native, features: [:cuda, :tensorrt]
Load the model
Then you need just a few lines of code to get a list of objects detected in the image.
model = YOLO.load([
  model_path: "models/yolov8n.onnx",
  classes_path: "models/yolov8n_classes.json",

  # Ortex execution providers (same as the `:ortex` config)
  # Mac with CoreML
  eps: [:coreml] # or [:directml] or [:cuda, :tensorrt], default: [:cpu]
])

mat = Evision.imread(image_path)

model
|> YOLO.detect(mat)
|> YOLO.to_detected_objects(model.classes)
This code returns a list of detected objects along with their bounding box coordinates.
[
  %{
    class: "person",
    prob: 0.5744523406028748,
    bbox: %{h: 126, w: 70, cx: 700, cy: 570},
    class_idx: 0
  },
  %{
    class: "bicycle",
    prob: 0.6159384846687317,
    bbox: %{h: 102, w: 71, cx: 726, cy: 738},
    class_idx: 1
  },
  %{class: "car", prob: 0.6243442893028259, bbox: %{h: 87, w: 102, cx: 1039, cy: 268}, class_idx: 2},
  ...
]
YoloV8x
To run a larger YoloV8 model is simple.
Use the python script to generate the yolov8x.onnx model and the yolov8x_classes.json file.
python python/yolov8_to_onnx.py xThen you can load the model and use it just like before.
model_x = YOLO.load(model_path: "code/yolo/models/yolov8x.onnx", classes_path: classes_path)

model_x
|> YOLO.detect(mat)
|> YOLO.to_detected_objects(model_x.classes)
Make it faster with FastNMS
Non-Maximum Suppression (NMS) is what makes the postprocessing slow in the Elixir implementation. The native Nx implementation is not fast enough to achieve good real-time performance. With the YoloFastNMS library providing a Rust NIF implementation, it's possible to run the postprocessing much faster - simply include the dependency and pass the module to detect/3. This can speed up postprocessing by around 100x (from ~400ms to ~4ms on a MacBook Air M3).
def deps do
  [
    {:yolo_fast_nms, "~> 0.1"}
  ]
end
Then you can run the detection with FastNMS by passing the YoloFastNMS module to detect/3.
YOLO.detect(model, mat, nms_fun: &YoloFastNMS.run/3)Benchmarks
Below you find some YoloV8 benchmarks of full pipeline (preprocess, run, postprocess with NMS). Thanks to FastNMS NIF, pre and postprocessing speeds in Elixir YOLO are comparable to Python Ultralytics. The main performance difference between the two implementations comes from inference speed, where Elixir YOLO uses Ortex (Ort rust Library) for model execution. You can run benchmarks yourself on your machine with
MIX_ENV=bench mix run benchmarks/yolov8n.exs --eps cpu
and you can pass the --eps flag to specify the execution providers (coreml, directml, cuda, tensorrt)
| MacBook Air M3 | Library | N | S | X | |
| --- | --- | --- | --- | --- | |
| CPU | Elixir YOLO | 37ms | 93ms | 714ms | |
| CPU | Python Ultralytics | 28ms | 74ms | 250ms | |
| CoreML | Elixir YOLO | 19ms | 25ms | 65ms | |
| MPS | Python Ultralytics | 19ms | 24ms | 71ms |
For some reason Ultralytics with MPS backend has postprocessing really slow (~8ms with N model and 25ms with X model)
On my Ubuntu 24.04 Linux PC with RTX 4090, CUDA 12.6, I needed to set these environment variables, consider that the paths and versions in your computer might be different.
# CUDA environment variables
ELIXIR_ERL_OPTIONS="+sssdio 128"
XLA_TARGET=cuda12
TF_CUDA_VERSION='12.6'
EXLA_TARGET=cuda
XLA_FLAGS='--xla_gpu_cuda_data_dir=/usr/local/cuda-12.6'
| i9-13900K + RTX 4090 | Library | N | S | X | |
| --- | --- | --- | --- | --- | |
| CUDA | Python Ultralytics | 2.8ms | 2.6ms | 7.3ms | |
| CUDA | Elixir YOLO | 10ms | 11ms | 16ms |
YOLO.NMS vs YoloFastNMS
Reason why, if you want to run YOLO in real-time, you need to use YoloFastNMS.
Name                  ips        average  deviation         median         99th %
YoloFastNMS        528.63        1.89 ms     ±0.56%        1.89 ms        1.93 ms
YOLO.NMS             2.28      437.78 ms     ±0.43%      438.21 ms      441.01 ms

Comparison:
YoloFastNMS        528.63
YOLO.NMS             2.28 - 231.42x slower +435.89 ms

Memory usage statistics:

Name           Memory usage
YoloFastNMS      0.00651 MB
YOLO.NMS          810.22 MB - 124497.68x memory usage +810.21 MB
preprocess/3, run/2, postprocess/4
benchmarks/yolov8n_pipeline.exs
On a MacBook Air M3 with CoreML execution provider:
Name                          ips        average  deviation         median         99th %
preprocess                 467.31        2.14 ms    ±11.15%        2.12 ms        2.76 ms
postprocess FastNMS        421.43        2.37 ms     ±6.04%        2.36 ms        2.68 ms
run                         27.04       36.98 ms     ±3.01%       36.74 ms       40.18 ms

Comparison:
preprocess                 467.31
postprocess FastNMS        421.43 - 1.11x slower +0.23 ms
run                         27.04 - 17.28x slower +34.84 ms

Memory usage statistics:

Name                        average  deviation         median         99th %
preprocess                 43.78 KB     ±0.00%       43.78 KB       43.78 KB
postprocess FastNMS         2.02 KB    ±92.71%        1.18 KB        6.62 KB
run                         1.18 KB     ±0.00%        1.18 KB        1.18 KB

Comparison:
preprocess                 43.78 KB
postprocess FastNMS         2.02 KB - 0.05x memory usage -41.76387 KB
run                         1.18 KB - 0.03x memory usage -42.60156 KB
On i9-13900K + RTX 4090 with CUDA execution provider:
Operating System: Linux
CPU Information: 13th Gen Intel(R) Core(TM) i9-13900K
Number of Available Cores: 32
Available memory: 62.51 GB
Elixir 1.16.2
Erlang 26.2.5
JIT enabled: true

Name                          ips        average  deviation         median         99th %
preprocess                 962.58        1.04 ms    ±31.26%        0.90 ms        1.88 ms
postprocess FastNMS        555.80        1.80 ms    ±17.49%        1.69 ms        3.25 ms
run                        132.19        7.56 ms    ±12.47%        7.30 ms       12.55 ms

Comparison:
preprocess                 962.58
postprocess FastNMS        555.80 - 1.73x slower +0.76 ms
run                        132.19 - 7.28x slower +6.53 ms

Memory usage statistics:

Name                        average  deviation         median         99th %
preprocess                 46.84 KB     ±0.00%       46.84 KB       46.84 KB
postprocess FastNMS         2.27 KB    ±92.36%        1.54 KB        6.54 KB
run                         1.23 KB     ±0.00%        1.23 KB        1.23 KB

Comparison:
preprocess                 46.84 KB
postprocess FastNMS         2.27 KB - 0.05x memory usage -44.57674 KB
run                         1.23 KB - 0.03x memory usage -45.61719 KB
Livebook Examples
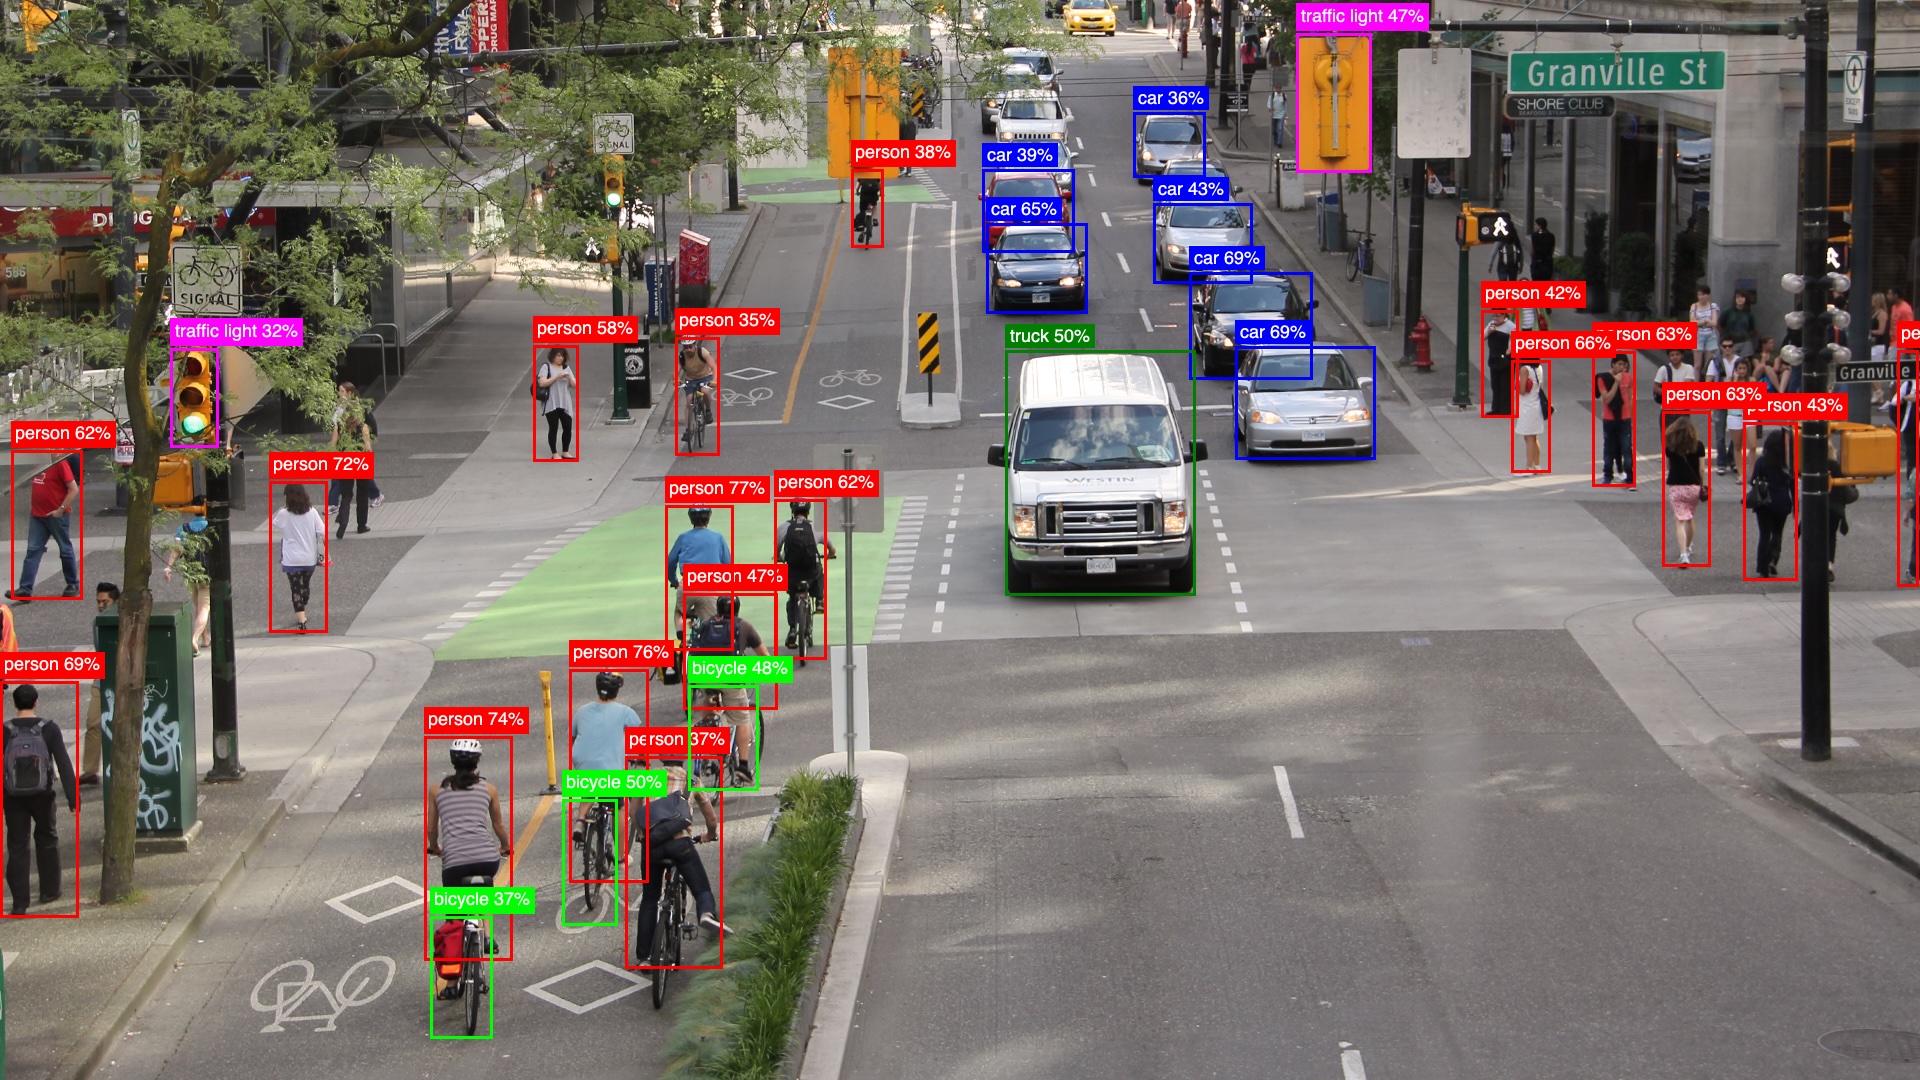
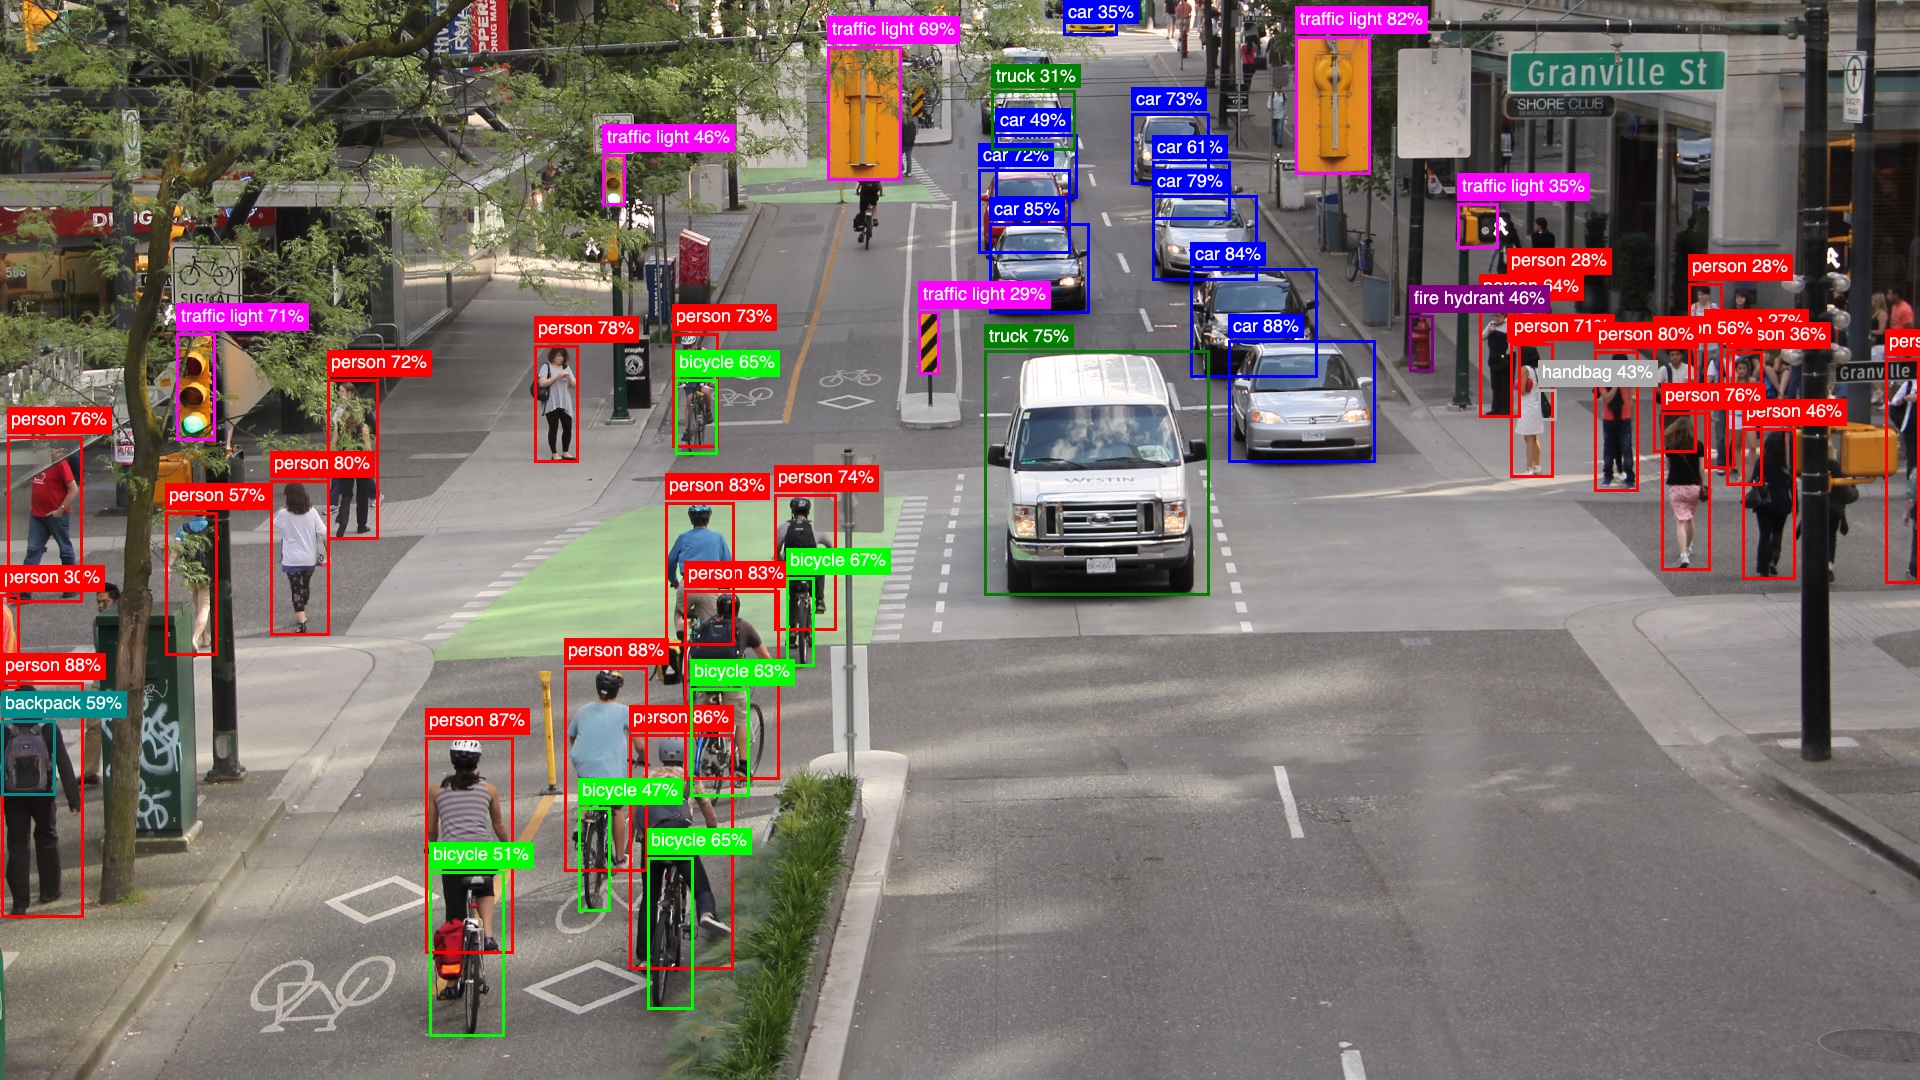
- YoloV8 Single Image: A beginner-friendly example that demonstrates object detection on a single image, comparing results between the lightweight YOLOv8n model and the more accurate YOLOv8x model.
- Make it faster with YoloFastNMS: A livebook that shows how to use the
YoloFastNMSlibrary to speed up the object detection postprocessing. - Real-time Object Detection: A livebook that demonstrates real-time object detection using your computer's webcam, with live frame updates and visualization of detected objects.
Under the Hood
Let's see how YOLO.detect/3 works.
Load YoloV8n Model
Loads the YoloV8n model using the model_path and classes_path. Optionally, specify model_impl, which defaults to YOLO.Models.Ultralytics.
model = YOLO.load([
  model_path: "models/yolov8n.onnx",
  classes_path: "models/yolov8n_classes.json"
])
Preprocessing
mat = Evision.imread(image_path)

{input_tensor, scaling_config} = YOLO.Models.Ultralytics.preprocess(model, mat, [frame_scaler: YOLO.FrameScalers.EvisionScaler])
Before running object detection, the input image needs to be preprocessed to match the model's expected input format. The preprocessing steps are:
Resize and Pad Image to 640x640
- The image is resized while preserving aspect ratio to fit within 640x640 pixels
- Any remaining space is padded with gray color (value 114) to reach exactly 640x640
- This is handled by the
FrameScalerbehaviour and its implementations
Convert to Normalized Tensor
- The image is converted to an Nx tensor with shape
{1, 3, 640, 640} - Pixel values are normalized from
0-255to0.0-1.0range - The channels are reordered from
RGBto the model's expected format (BGRin this case)
- The image is converted to an Nx tensor with shape
The FrameScaler behaviour provides a consistent interface for handling different image formats:
EvisionScaler- For OpenCV Mat images from EvisionImageScaler- For images using the Image libraryNxIdentityScaler- For ready to use Nx tensors
Run Object Detection
Then run the detection by passing the model and the image tensor input_tensor.
# input_tensor {1, 3, 640, 640}
output_tensor = YOLO.Models.run(model, input_tensor)
# output_tensor {1, 84, 8400}
You can also adjust detection thresholds (iou_threshold and prob_threshold, which both default to 0.45 and 0.25 respectively) using the third argument.
Postprocessing
result_rows = YOLO.Models.Ultralytics.postprocess(model, output_tensor, scaling_config, opts)where result_rows is a list of lists, where each inner list represents a detected object with 6 elements:
[
  [cx, cy, w, h, prob, class_idx],
  ...
]
The model's raw output needs to be post-processed to extract meaningful detections. For YOLOv8n, the output_tensor has shape {1, 84, 8400} where:
- 84 represents 4 bbox coordinates + 80 class probabilities
- 8400 represents the number of candidate detections
The postprocessing steps are:
Filter Low Probability Detections
- Each of the 8400 detections has probabilities for 80 classes
- Only keep detections where max class probability exceeds
prob_threshold(default 0.25)
Non-Maximum Suppression (NMS)
- Remove overlapping boxes for the same object
- For each class, compare boxes using Intersection over Union (IoU)
- If IoU >
iou_threshold(default 0.45), keep only highest probability box - This prevents multiple detections of the same object
Scale Coordinates
- The detected coordinates are based on the model's 640x640 input
- Use the
scaling_configfrom preprocessing to map back to original image size - This accounts for any resizing/padding done during preprocessing
Convert Detections to Structured Maps
Finally, convert the raw detection results into structured maps containing bounding box coordinates, class labels, and probabilities:
iex> YOLO.to_detected_objects(result_rows, model.classes)
[
  %{
    class: "person",
    prob: 0.57,
    bbox: %{h: 126, w: 70, cx: 700, cy: 570},
    class_idx: 0
  },
  ...
]
Current Limitations
The current implementation supports YOLOv8 models with a fixed 640x640 input size (even though YOLOv8x6 supports 1280x1280 images) and a fixed 84x8400 output size. This setup handles 80 classes from the COCO dataset and 8400 detections.
The library is designed to be extensible through the YOLO.Model behaviour, allowing other YOLO versions or custom model implementations to be added in the future.
Future Plans
One of the next goals (listed in the TODO section below) is to support models with different input and output sizes. This update would allow the library to work with YOLO models trained on other datasets or even custom datasets, making it more flexible and useful.
TODOs
Improvements
- [ ] Support dynamically different input and output shapes. (This is going to be fundamental to support different models with custom classes).
- [ ] Kino library to easily visualize detections
Experiments
- [X] CUDA benchmarks
- [ ] Object tracking
- [ ] Run it on Nerves Rpi5
- [ ] Run it on Jetson
- [ ] Sharding